Open AI Standards for AI Agents: ACP, MCP, and Agent Skills
This article outlines how Agent Skills can manage a Home Assistant configuration using the open AI standards ACP, MCP, and Agent Skills.
Table of Contents
Introduction
This hands-on article is for software engineers and DevOps professionals who want the best from AI agents and the freedom to swap editors, runtimes, and models. Using Home Assistant as a practical example, I show how the open standards MCP, ACP, and Agent Skills work together to create a portable workflow for drafting, validating, and applying configuration changes. The examples use Anthropic’s Claude Code, but the patterns apply to any vendor supporting these standards.
The structure of this article moves from concepts to practice: it introduces open AI standards first, then presents Home Assistant as the target system, and finally applies the standards in a concrete end‑to‑end workflow. For brevity, detailed error handling and security hardening are omitted; please use any products or software presented here at your own risk. If something doesn’t work as expected, feel free to file issues in the ha-homebook repository.
The work was inspired by Florian Motlik’s use of Agent Skills to instruct LLMs on how to implement Home Assistant configuration. The companion project source code is available on Codeberg.
Open AI Standards: ACP, MCP, and Agent Skills
Figure 1 presents the system architecture with its component relationships, and the remainder of this section explains the technical terms used throughout the rest of the article.

Figure 1: Components and protocols used in the AI-based development workflow
Agent Client Protocol (ACP) is the editor-agent interface layer. It defines a standardized communication framework that enables code editors and IDEs to interact with AI coding agents, similar to how the Language Server Protocol standardized editor-language tool integration. ACP decouples agents from editors, allowing both to innovate independently and giving developers freedom to choose their preferred tools without vendor lock-in. In this article, we use ACP to connect editors such as Emacs to AI agents. Note that the Agent Client Protocol is distinct from agent-to-agent protocols like the Agent Communication Protocol (now merged into A2A, the Agent2Agent Protocol), which focuses on standardized peer-to-peer agent interoperability and direct agent-to-agent exchange, while ACP centers on human-to-agent communication within development environments.
MCP (Model Context Protocol) defines how agents access tools, files, and services with typed interfaces. Use MCP whenever an agent needs reliable access to a repository or external systems so it can read data and apply changes safely. MCP can be compared to Remote Procedure Calls (RPC): it is yet another standard that describes how to invoke remote functionality. In contrast to classic RPCs, MCP is tailored to the needs of LLMs. At the time of writing a large number of MCP servers already exists, e.g. Awesome MCP Servers.
Agent Skills is the capability layer. It packages repeatable, auditable workflows that agents can execute consistently across environments. See Anthropic’s Agent Skills Overview for a concise introduction. Agent Skills define the task contract (inputs, outputs, constraints) as well as the invocation criteria that determine when an agent should call them. The emphasis is on predictability and reviewability rather than the mechanics of tool access or messaging. Because of that scope, Agent Skills sit above protocols like MCP, ACP, or A2A. Those protocols define how agents connect to tools or communicate with each other; Agent Skills describe the reusable capabilities that are executed on top of those protocols, independent of any specific transport or runtime.
In practice, major platforms document their skill configurations in Codex Skills, Claude Code Skills, and Copilot Skills (see Use Agent Skills in VS Code). Curated skill catalogs of respective vendors can be found in the OpenAI Skills and Anthropic Skills directories. There are also lists of Agent Skills maintained by individual developers, such as Awesome Agent Skills.
Home Assistant
This section introduces Home Assistant as the target system for the standards discussed above. Home Assistant is an open-source home automation platform that integrates devices and services into a single, locally controlled system. It exposes a rich model of entities (sensors, switches, lights, etc.) and automations that can be created in the UI or defined as configuration-as-code. Core configuration, integrations, and packages are commonly stored in YAML, while the UI maintains registries for devices, entities, automations, and scenes (mostly in JSON format).
This makes Home Assistant a great target for LLM-assisted development: it is large, repetitive, and heavily structured, and the work is often about applying consistent edits across many files. An agent can help with bulk updates, refactoring, and validation, while still keeping the configuration reviewable and deterministic.
Home Assistant also exposes programmatic interfaces that matter for an AI workflow. The Home Assistant REST API provides access to states and services so tools can read current entity data and trigger actions (such as configuration reloads) in a controlled way. The Home Assistant Configuration (YAML) documentation defines the declarative format that most configuration-as-code lives in (see Code Snippet 1 for an example directory structure). In the workflow described below, we pull the Home Assistant configuration via SSH/rsync so the agent can edit it locally. Home Assistant also provides a Built-In MCP Server which allows LLMs to inspect entities and call services at runtime. In this article, we build our own MCP server for the repository and configuration workflow, focusing on safe edits, validation, and review, while the built-in MCP server remains the runtime interface to the live system.
.
├── packages
│   ├── eg_bad.yaml
│   └── living_room.yaml
├── automations.yaml
├── configuration.yaml
├── scenes.yaml
├── scripts.yaml
└── secrets.yaml
With Home Assistant defined, we can now apply ACP, MCP, and Agent Skills to help an AI agent implement and validate configuration changes.
Connecting Agents: Agent Client Protocol (ACP)
The Agent Client Protocol (ACP) provides a standardized interface from IDEs/editors to AI agents. Created by Google and Zed Industries as an alternative to proprietary approaches, ACP has been joined by JetBrains and other tools to support open standards. This enables the workflow described here to work across multiple editors (Emacs, Zed, Neovim, JetBrains) rather than locking into a single vendor’s ecosystem.
On the agent side (the “server side”), developers can achieve ACP support either by providing extensions to agent CLIs (Claude Code, OpenAI Codex) or by the agent CLIs directly (e.g. Vibe CLI or Gemini CLI). An extensive list of agents is provided by the Agent Client Protocol project website.
On the client side, editors like Zed, Neovim, and JetBrains natively support ACP (see the full list of supported editors). I use Emacs with agent-shell to connect to different AI agents. VS Code uses a proprietary communication protocol and does not natively support ACP, though there is an open GitHub issue requesting support. VS Code users can use the repository with VS Code’s native agent capabilities (see Using agents in Visual Studio Code) or enable ACP via the community extension VSCode ACP, though this is not officially supported by Microsoft.
ACP is optional for this workflow. If your editor or agent doesn’t support ACP, you can still use all the MCP servers and Agent Skills described here. You’ll just interact with the agent through its native interface instead of a standardized IDE integration protocol.
Connecting Tools: Model Context Protocol (MCP)
This workflow uses two MCP servers: the official Home Assistant MCP server for runtime interaction with the live system, and our custom MCP server (homebook) for repository and configuration management. The homebook server enables LLMs to pull configurations via SSH/rsync, validate them remotely, and push changes back safely. To get started with the companion code, follow the Hands-on Setup guide in the ha-homebook repository.
The following sections explain how to implement the homebook MCP server and integrate both servers into IDEs.
Implementing an MCP Server
The homebook library provides the following tools:
- Restarting Home Assistant remotely
- Reloading the Home Assistant configuration
- Check/Validate the Home Assistant configuration
- Pull the Home Assistant configuration
- Push the Home Assistant configuration
Figure 2 shows the internals of the homebook MCP server. We use FastMCP to wrap the homebook library functions. In addition to the FastMCP wrappers, we also provide individual CLIs in order to invoke the provided tools directly from user shells (convenience). The homebook library in turn interacts with an existing Home Assistant instance via interfaces such as SSH (e.g. rsync to transfer configuration from and to the Home Assistant instance) or Home Assistant’s REST API (e.g. check/validate the configuration).

Figure 2: Home Assistant development tooling for AI models
With FastMCP, implementing an MCP server on top of an existing API (see Code Snippet 2) is straightforward: you create a server instance, annotate Python functions with @mcp.tool(), and their docstrings become the tool descriptions that the LLM sees.
# other imports
from mcp.server.fastmcp import FastMCP

mcp = FastMCP("homebook")

# initialize logging, configuration handling, etc.

@mcp.tool()
def ha_restart() -> None:
    """Restart Home Assistant entirely."""
    ha_restart_impl(get_config().homeassistant_url)


@mcp.tool()
def ha_config_pull() -> None:
    """Pull Home Assistant configuration."""
    ha_config_pull_impl(get_config())


# other MCP tools left out for brevity
To manually test the MCP server, use the MCP Inspector (included in the MCP Python SDK):
uv sync
HOMEBOOK_CONFIG=homebook.yaml \
    uv run mcp dev src/homebook/mcp_server.py
The MCP Inspector’s web frontend also allows for interacting with the Home Assistant Built-In MCP server. The connection parameters to interact with it from the MCP Inspector are as follows:
- Transport Type: Streamable HTTP
- URL: http://homeassistant.lan:8123/api/mcp (adjust this to your needs)
- Connection Type: Via Proxy
- Authentication: Custom Headers
- Name:
Authorization - Value:
Bearer ...(replace...with your Long Lived Access Token)
- Name:
With the MCP Inspector, you can list and invoke the tools that Home Assistant’s built-in MCP server exposes, for example toggling lights. Once you integrate that MCP server with the AI agent, you can trigger automations in plain language through the prompt interface.
Integrating Multiple MCP Servers into IDEs
Code Snippet 4 shows how I integrated the two MCP servers with Claude Code. My homebook MCP server is attached via standard streams (stdio). The existing Home Assistant MCP server is integrated via streamable HTTP. For authentication, I provided a Long Lived Access Token. The token is provided by the HOMEASSISTANT_APIKEY environment variable in the development environment.
Anthropic Claude’s official docs explain further options and give additional examples how other MCP servers can be integrated.
{
  "mcpServers": {
    "homebook": {
      "type": "stdio",
      "command": "uv",
      "args": ["run", "homebook-mcp", "-c", "homebook.yaml"]
    },
    "homeassistant": {
      "type": "http",
      "url": "http://homeassistant.lan:8123/api/mcp",
      "headers": {
        "Authorization": "Bearer ${HOMEASSISTANT_APIKEY}"
      }
    }
  }
}
Almost all AI models share similar configuration directives, but they are often expected in different places. VS Code expects the MCP server configuration in .vscode/mcp.json. In case you want to try the components of this repository in VS Code, the documentation for integrating MCP servers can be found here: Use MCP servers in VS Code.
To reduce human intervention in the development process, we explicitly allow access to the homebook tools without acknowledgment (Code Snippet 5). Please note that this simplification may pose a security risk, as LLMs can now execute the selected actions without further consultation. An example of the Claude Code MCP tools permissions (.claude/settings.json file in the project repository):
{
  "permissions": {
    "allow": [
      "mcp__homebook__ha_config_check",
      "mcp__homebook__ha_config_pull",
      // ...
    ]
  },
  "enableAllProjectMcpServers": true,
  "enabledMcpjsonServers": [
    "homebook"
  ]
}
You are now able to test your MCP servers with LLMs like Claude Code with prompts such as Turn on the lights in my bathroom or Check the validity of my Home Assistant configuration.
High Level Workflows: Agent Skills
When developing with AI for my home automation system based on Home Assistant, I use Agent Skills mainly to orchestrate high-level workflows. My AI development system carries out the lower-level interaction with Home Assistant using scripts which are part of used Agent Skills or by utilizing several tools through the Model Context Protocol.
Agent Skills are supported by most LLMs and typically consist of multiple elements: an overview document (SKILL.md with YAML frontmatter containing metadata and Markdown content), utility scripts, API references, and examples (see their docs). For Claude Code, skills are defined in projects’ .claude/skills/ directories. Our Home Assistant Development Workflow skill is defined in .claude/skills/ha-development-workflow/ in the project repository.
The skill is primarily defined in Markdown format (SKILL.md), providing agents with a structured 9-step workflow, troubleshooting guidance, and example scenarios. It includes a Python validation script (validator.py) that checks YAML syntax locally before pushing configurations to Home Assistant. The validator supports the --ignore-unknown-tags flag to skip Home Assistant-specific YAML tags like !secret and !include, enabling syntax validation without requiring Home Assistant-specific YAML parsers. This two-stage validation approach (local syntax checking followed by remote semantic validation via Home Assistant’s API) catches low-level errors early while ensuring configuration correctness.
The higher level workflow defined by this skill requires connected agents to perform the following tasks:
- Pull the latest configuration via SSH/rsync (
ha_config_pulltool). - Read and understand existing automations.
- Generate new automation YAML.
- Invoke the YAML validator script to check generated YAML files locally.
- Push the updated and locally validated configuration via SSH/rsync (
ha_config_pushtool). - Validate the updated Home Assistant configuration through Home Assistant’s REST API (
ha_config_checktool). - Restore the Home Assistant configuration in case of validation errors.
- Reload the Home Assistant configuration (
ha_config_reloadtool). - Restart Home Assistant in case reloading does not result in any changes (
ha_restarttool).
In summary, Agent Skills orchestrate the high-level workflow. MCP tools or scripts (as part of Agent Skills) provide the low-level operations, and the permissions configuration enables autonomous execution with minimal human interruption. The next section demonstrates how to implement an automation based on aforementioned mechanisms.
Practical Use-Case: 3D Printer Mains Switch
As a sample use-case, I want to switch mains power of my 3D printer using a Shelly Plug S with a Homematic IP switch (HMIP-WRC2). The component consists of two buttons, one of which is already in use to control my stairway lights. While LLMs can identify devices by their name, explicitly providing component IDs (available from Home Assistant’s user interface) ensures the agent targets the exact device without ambiguity. Code Snippet 6 shows the prompt for this use case:
Following the Home Assistant development workflow, please implement the following automation:

One of my homematicip_local buttons should control mains power of my 3D printer.

3D Printer (Shelly Plug):

- entity ID: switch.3d_print_mains_power

HomematicIP Buttons:

- device_id: 14d78d55059ad30a0f4eb4c0b02e98a4
- serial number: 00019D89BE8CF7
The agent finds existing automations and mimics their structure, demonstrating how LLMs identify patterns in integrations, devices, and entities. The following figure shows a screencast of me passing this prompt from my Emacs setup to my Home Assistant development agent via ACP. I just made sure the agent found the required components such as MCP servers and Agent Skills beforehand.
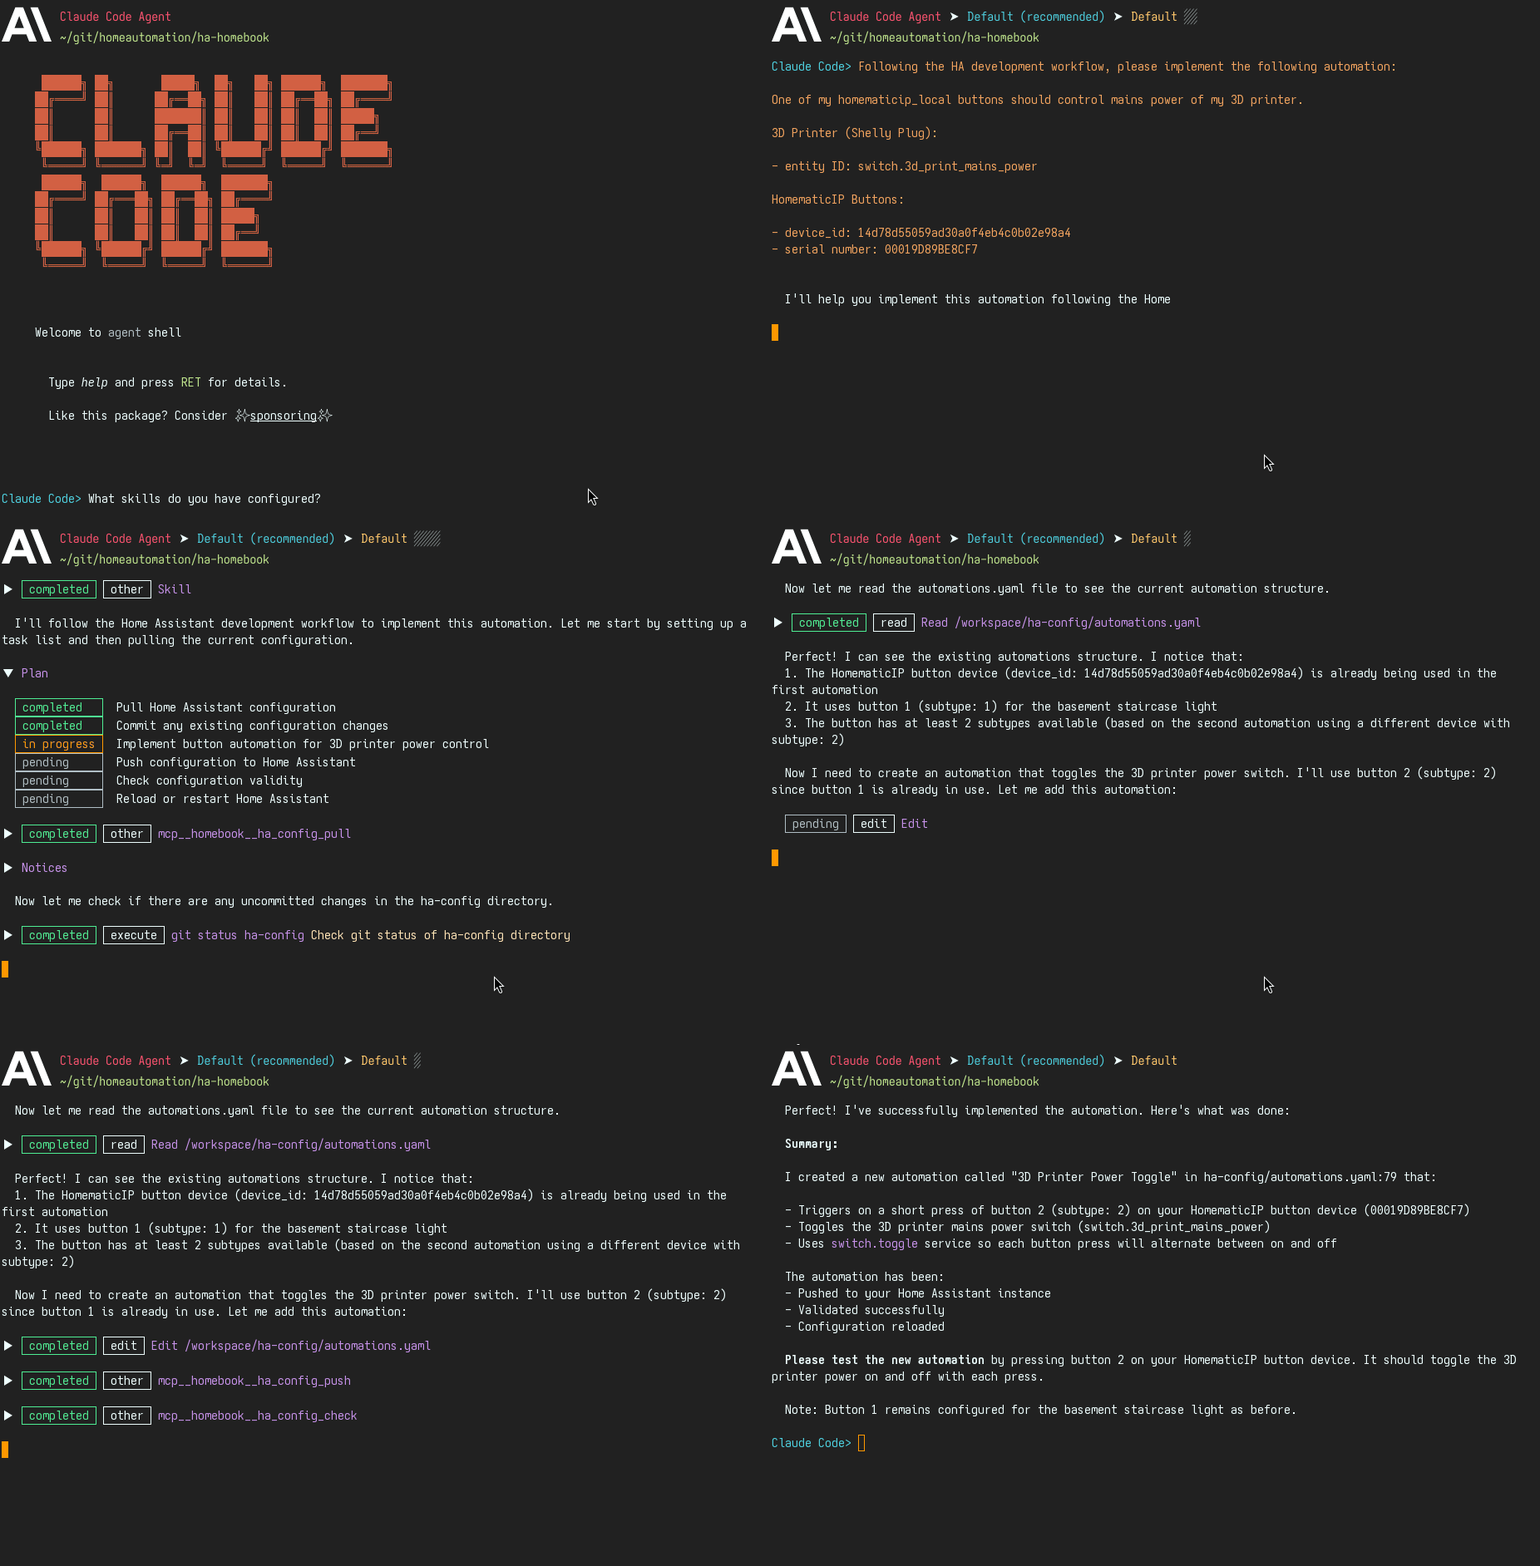
Figure 3: Demo of the Home Assistant development workflow Agent Skill
In Figure 3 the agent executed the complete workflow: it pulled the latest configuration from my Home Assistant instance, analyzed existing automations, generated the new automation matching the existing structure, validated it, then reloaded the Home Assistant configuration. The entire process took under 90 seconds.
This example demonstrates the complete workflow without requiring deep home automation domain knowledge. For more complex scenarios, such as multi-condition automations coordinating multiple devices, the same workflow scales naturally because the agent can analyze more existing automations and compose similar patterns.
Code Snippet 7 shows what the agent added to my `configuration.yaml` file based on the prompt above:
# ... (existing list of automations above the following entry)
- id: '1736077200000'
  alias: 3D Printer Power Toggle
  description: Toggle 3D printer mains power with HomematicIP button
  trigger:
  - platform: device
    domain: homematicip_local
    device_id: 14d78d55059ad30a0f4eb4c0b02e98a4
    event_type: homematic.keypress
    address: 00019D89BE8CF7
    device_type: HMIP-WRC2
    interface_id: RaspberryMatic-HmIP-RF
    type: press_short
    subtype: 2
  condition: []
  action:
  - service: switch.toggle
    target:
      entity_id: switch.3d_print_mains_power
  mode: single
After the configuration reload completed successfully, I verified that the automation works as expected: pressing button 2 on the wall switch (identified here by the subtype: 2 part) reliably toggles the 3D printer’s mains power.
Conclusion and Outlook
This article demonstrated how based on the open standards ACP, MCP, and Agent Skills I created a practical workflow for AI-assisted Home Assistant configuration management. By combining these protocols, LLMs can modify configuration files, validate changes, and interact with a running instance while making sure one can always revert to an older configuration state. The key benefits of the presented approach are vendor independence, the ability to switch between LLM providers without rewriting workflows, and clear separation of concerns.
AI developments are accelerating rapidly, which means the half-life of this article may be relatively short. Yet the foundational patterns - using open standards, separating integration concerns and the ability to swap components - should remain relevant as specific tools evolve.
This blog post was created with non-creative assistance from a generative AI. Thanks to my friend Fritz Grabo for reviewing this article and providing valuable feedback.