Integrating Lab Equipment into pytest-Based Tests
This article is about integrating lab equipment into pytest. By doing so, we can automate setting electrical parameters and implement sequences such as operating devices in edge cases.
Table of Contents
Introduction and Related Work
To perform high-level tests, the brilliant pytest framework allows for automating virtually anything that would be needed to achieve this goal. Besides many components and extensions that already exist for pytest it is also easy to integrate new ones. In this blog post I want to demonstrate how my lab equipment such as a lab power supply or a digital multimeter (DMM) will be integrated into some system tests.
The impatient among you can wrap their heads around the companion source code which is hosted on GitHub.
The device under test (DUT) will be the DC-DC converter of my e-bike battery to USB-C adapter. This device is used to power my notebook when working in outdoor remote places. Using my lab equipment and pytest I can automate testing my adapter under typical environmental settings. Here is a photo of this device for a better understanding:
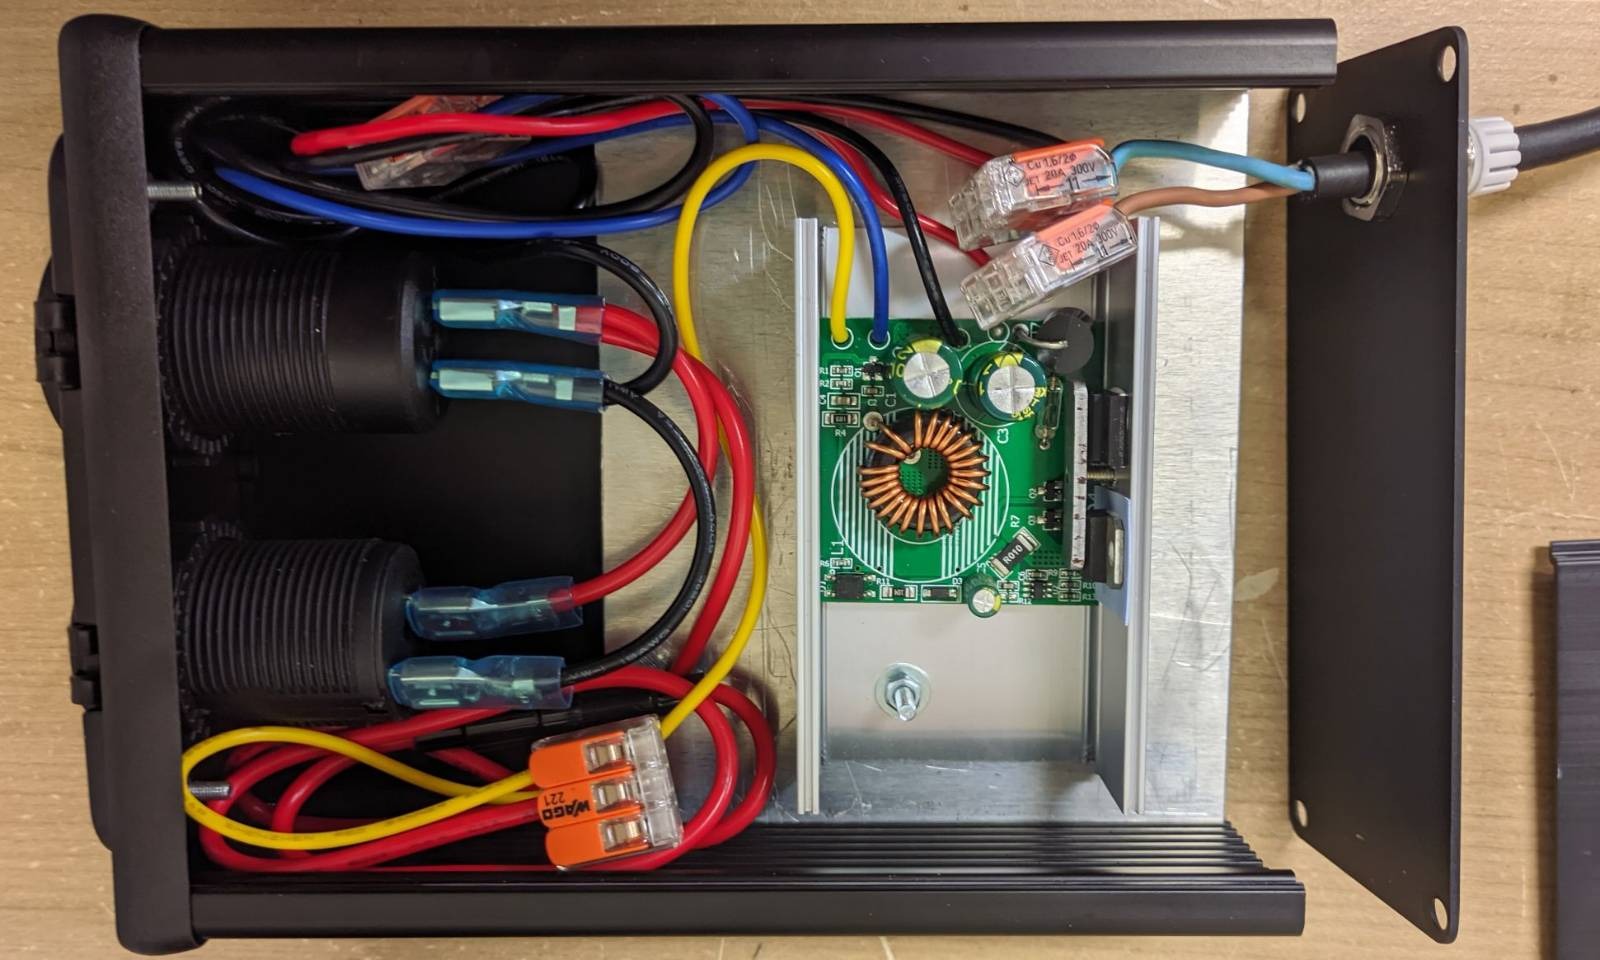
The adapter is a simple device that has an XT60 connector on the cable that leads from the right side into the housing. Please note that cable reliefs are currently missing. The cable leading into the housing is attached to a DC-DC converter (our DUT) that reduces the input voltage from the given input range (36-72 VDC) to 12 VDC. The reduced voltage is the input voltage for the USB-C adapter (which expects 12 VDC).
We, of course, are not the first ones, using Python for automating tasks involving lab equipment:
One can also use ChatGPT to generate classes for interfacing lab equipment with Python. My success with this approach was rather limited. Generated classes were incorrect in most cases, e.g. due to my equipment not being that popular or OpenAI’s LLM being wrong.
This article is structured as follows: in a first step, we will make our lab equipment available in Python in general. This is what we call device classes. Then, in the second part, we will make these device classes available to pytest using so-called fixtures. These fixtures in turn can be used to interact with our lab equipment in a standardized way in our actual test code. Actual tests will be written in the third and last part of this article.
Interacting with my Lab Equipment in Python
Let’s get our hands dirty and integrate aforementioned lab equipment. In the course of this article, I want to control my Riden RD6018 lab power supply, Stefan’s programmable DC load Rigol DL3021 and my PeakTech 2025 digital multimeter from pytest tests. These are low budget components, but developing for more sophisticated equipment is not that different. One still has to write code against the same software interfaces such as VISA (e.g. using pyVISA) or ModBus.
Power Supply: Riden RD6018
The device classes of the Riden RD6018 power supply are based on the stock firmware. However, there exists alternative firmware, e.g. the one published by UniSoft (Alternative link: Google Drive) which we do not cover in this article. The Riden RD6018 lab power supply can be controlled by an open-source library available on GitHub called Riden. I have forked this repository in order to elaborate on the typing hints. The following command install the Riden package directly from my branch in my GitHub fork:
pip install git+https://github.com/honeytreelabs/Riden.git@dev-fix-typing-hints
Result:
Collecting git+https://github.com/honeytreelabs/Riden.git@dev-fix-typing-hints
  Cloning https://github.com/honeytreelabs/Riden.git (to revision dev-fix-typing-hints) to /tmp/pip-req-build-28u6vcm_
  Resolved https://github.com/honeytreelabs/Riden.git to commit f45ee21596284042aeeecb06c0873616708369a2
  Installing build dependencies: started
  Installing build dependencies: finished with status 'done'
  Getting requirements to build wheel: started
  Getting requirements to build wheel: finished with status 'done'
  Preparing metadata (pyproject.toml): started
  Preparing metadata (pyproject.toml): finished with status 'done'
Requirement already satisfied: click<9.0.0,>=8.0.3 in /home/rpoisel/.pyenv/versions/pytest-labgrid/lib/python3.11/site-packages (from riden==1.2.0) (8.1.3)
Requirement already satisfied: modbus_tk<2.0.0,>=1.1.2 in /home/rpoisel/.pyenv/versions/pytest-labgrid/lib/python3.11/site-packages (from riden==1.2.0) (1.1.3)
Requirement already satisfied: pyserial<4.0,>=3.5 in /home/rpoisel/.pyenv/versions/pytest-labgrid/lib/python3.11/site-packages (from riden==1.2.0) (3.5)
Building wheels for collected packages: riden
  Building wheel for riden (pyproject.toml): started
  Building wheel for riden (pyproject.toml): finished with status 'done'
  Created wheel for riden: filename=riden-1.2.0-py3-none-any.whl size=8653 sha256=c15f7d4b7b8105c10bc0627c0f7a2ae8a1ae27cbd030db1bfdb45b24d1c8caa3
  Stored in directory: /tmp/pip-ephem-wheel-cache-lq3yijws/wheels/c2/c3/8f/5affaf964738ede24d60b7c0d895ee0d1c45d189e22d92fb25
Successfully built riden
Installing collected packages: riden
Successfully installed riden-1.2.0
Now we are ready to access the power supply. Based on the original sample code, I created my own sample that sets the output voltage to 24, 36, 48, and 64 volts, respectively:
 1import sys
 2import time
 3
 4from riden import Riden
 5import serial
 6
 7
 8def main(serial_port: str) -> int:
 9    try:
10        r = Riden(port=serial_port, baudrate=115200, address=1)
11        print(f'Serial Number: {r.get_sn()}')
12        print(f'Firmware: {r.get_fw()}')
13        r.set_output(True)
14        for voltage in [24, 36, 48, 60]:
15            for amperage in [0.3, 0.5, 1]:
16                print(f'Current voltage setting: {r.get_v_set()}')
17                print(f'Current amperage setting: {r.get_i_set()}')
18                r.set_v_set(voltage)
19                r.set_i_set(amperage)
20
21                r.update()
22                print(f'New voltage: {r.v_set}')
23                print(f'New amperage: {r.i_set}')
24        time.sleep(1)
25        r.set_output(False)
26        return 0
27    except (FileNotFoundError, serial.SerialException):
28        print(f'Could not open {serial_port}. Device connected?')
29        return 1
30
31
32if __name__ == "__main__":
33    sys.exit(main(sys.argv[1] if len(sys.argv) > 1 else '/dev/ttyUSB0'))
python 60xx.py
INFO:root:Serial Number: 00009981
INFO:root:Firmware: 136
INFO:root:Current voltage setting: 36.0
INFO:root:Current amperage setting: 0.3
INFO:root:New voltage: 24.0
INFO:root:New amperage: 0.3
INFO:root:Current voltage setting: 24.0
INFO:root:Current amperage setting: 0.3
INFO:root:New voltage: 24.0
INFO:root:New amperage: 0.5
...
The Riden class of the riden package can be used out-of-the-box in pytest fixtures. Fixtures, as we will see in a later section, are used to prepare the test environment to run the actual test logic.
Digital Multimeter: PeakTech 2025
The communication protocol of this digital multimeter (DMM) is well specified: PeakTech 2025 - Communication Protocol. Nevertheless, someone already implemented the protocol in Python (thank you, unknown person). It is available on GitHub.
The DMM is accessed via Linux’ hidraw subsystem. In order to allow for unprivileged users to access these devices, the following entry has to be added to /etc/udev/rules.d/99-hid.rules (I am using Debian GNU/Linux):
KERNEL=="hidraw*", ATTRS{idVendor}=="2571", ATTRS{idProduct}=="4100", MODE="0666"
After adding this entry, udev has to be informed to re-evaluate its configuration files.
sudo udevadm control --reload-rules && sudo udevadm trigger
Let’s implement a simple script which allows for interacting with the DMM. First, we have to use the pyudev package to find any attached PeakTech 2025 devices by their USB vendor and model IDs (find_dmm() function).
 1from typing import List, Optional
 2import logging
 3import sys
 4
 5import pyudev
 6import serial
 7
 8def find_dmm() -> Optional[str]:
 9    context = pyudev.Context()
10
11    for device in context.list_devices(subsystem="hidraw"):
12        usb_device = device.find_parent("usb", "usb_device")
13        if usb_device == None:
14            continue
15        if usb_device.get("ID_VENDOR_ID") == "2571" and usb_device.get("ID_MODEL_ID") == "4100":
16            if not device.device_node:
17                raise ValueError('unknown device node')
18            return device.device_node
19    return None
20
21
22def extract_value(frame: bytes) -> float:
23    ...
24
25
26def extract_unit(frame: bytes) -> str:
27    ...
28
29
30class DMM:
31
32    def __init__(self) -> None:
33        dmm_path = find_dmm()
34        if not dmm_path:
35            raise RuntimeError('Could not find PeakTech 2025.')
36        self.fd = open(dmm_path, 'rb')
37
38    def __del__(self) -> None:
39        if hasattr(self, 'fd') and not self.fd.closed:
40            self.fd.close()
41
42    def __read_frame(self) -> bytes:
43        return self.fd.read(8)
44
45    def read_measurement(self) -> Measurement:
46        frame = self.__read_frame()
47        return Measurement(extract_value(frame), extract_unit(frame))
48
49
50def main() -> int:
51    logging.basicConfig(level=logging.INFO)
52    try:
53        dmm = DMM()
54
55        for _ in range(5):
56            measurement = dmm.read_measurement()
57            logging.info(f'Measurement: {measurement}')
58
59        return 0
60    except RuntimeError as exc:
61        logging.error(f"An error occurred: {exc}")
62        return 1
63
64
65if __name__ == "__main__":
66    sys.exit(main())
In this sample, we open the device attached to the PeakTech 2025 DMM. After that, we try to read 5 data frames containing measurements. For the sake of brevity, parsing these 8 bytes data frames is not shown here. The full code is shown in the linked GitHub Gists below.
Let’s give it a try and execute it:
python peaktech_2025.py
INFO:root:Measurement: 0.0001 VDC
INFO:root:Measurement: 0.0001 VDC
INFO:root:Measurement: 0.0001 VDC
INFO:root:Measurement: 0.0001 VDC
INFO:root:Measurement: 0.0001 VDC
DC Load: Rigol DL3021
The programmable DC load can be accessed using pyVISA. Installation can be performed from default package sources:
pip install pyvisa pyvisa-py
Result:
Collecting pyvisa
  Using cached PyVISA-1.13.0-py3-none-any.whl (175 kB)
Collecting pyvisa-py
  Using cached PyVISA_py-0.7.0-py3-none-any.whl (70 kB)
Requirement already satisfied: typing-extensions in /home/rpoisel/.pyenv/versions/pytest-labgrid/lib/python3.11/site-packages (from pyvisa) (4.6.2)
Installing collected packages: pyvisa, pyvisa-py
Successfully installed pyvisa-1.13.0 pyvisa-py-0.7.0
The following code snippet sets the resistance to 3 Ohms. After that, the voltage, current, and power values are queried from the device:
 1import sys
 2import time
 3
 4import pyvisa
 5
 6def main() -> int:
 7    logging.basicConfig(level=logging.INFO)
 8    try:
 9        rm = pyvisa.ResourceManager()
10        inst = rm.open_resource("TCPIP0::192.168.1.5::INSTR")
11        # Query if instrument is present
12        # Prints e.g. "RIGOL TECHNOLOGIES,DL3021,DL3A204800938,00.01.05.00.01"
13        logging.info(inst.query("*IDN?"))
14        # Set to constant resistance mode
15        inst.write(":SOURCE:FUNCTION RESISTANCE")
16        # Set to 3 Ohms
17        inst.write(":SOURCE:RESISTANCE:LEVEL:IMMEDIATE 3.0")
18        # Enable electronic load
19        inst.write(":SOURCE:INPUT:STATE On")
20        # Wait for value to stabilize
21        time.sleep(2)
22        # Measure!
23        logging.info("Voltage: ", inst.query(":MEASURE:VOLTAGE?").strip())
24        logging.info("Current: ", inst.query(":MEASURE:CURRENT?").strip())
25        logging.info("Power: ", inst.query(":MEASURE:POWER?").strip())
26
27        return 0
28    except pyvisa.errors.VisaIOError as exc:
29        logging.error(f"An error occurred: {exc}")
30
31        return 1
32
33if __name__ == "__main__":
34    sys.exit(main())
As one can see, most of the device interaction is based on strings exchanged with the pyVISA library. In my view, this is quite prone to errors. In order to come around the situation, we will create a wrapper class that creates all these strings for us.
The wrapper class is defined like this:
 1from ipaddress import IPv4Address
 2import logging
 3import sys
 4
 5import pyvisa
 6
 7
 8class DCLoad:
 9
10    def __init__(self, ip: IPv4Address) -> None:
11        rm = pyvisa.ResourceManager()
12        self.inst = rm.open_resource(f"TCPIP0::{ip}::INSTR")
13        logging.info(self.inst.query("*IDN?"))
14
15    @property
16    def active(self) -> bool:
17        return int(self.inst.query(":SOURCE:INPUT:STATE?").strip()) == 1
18
19    @active.setter
20    def active(self, value: bool) -> None:
21        value_str = "On" if value else "Off"
22        self.inst.write(f":SOURCE:INPUT:STATE {value_str}")
23
24    ...
This way, we can activate the device’s output in a more convenient way, e.g.:
 1def main() -> int:
 2    logging.basicConfig(level=logging.INFO)
 3    try:
 4        dc_load = DCLoad(IPv4Address('192.168.1.14'))
 5        logging.info(f'DC Load is {"" if dc_load.active else "not "}active')
 6        dc_load.resistance = 3.0
 7        dc_load.active = True
 8
 9        logging.info(f'DC Load is {"" if dc_load.active else "not "}active')
10        logging.info(f'Voltage: {dc_load.voltage}')
11        logging.info(f'Current: {dc_load.current}')
12        logging.info(f'Power: {dc_load.power}')
13
14        return 0
15    except pyvisa.errors.VisaIOError as exc:
16        logging.error(f"An error occurred: {exc}")
17
18        return 1
19
20
21if __name__ == "__main__":
22    sys.exit(main())
Using the class in our sample program results in:
python rigol_dl3021.py
INFO:root:RIGOL TECHNOLOGIES,DL3021A,DL3A123456789,00.01.04.00.05

INFO:root:DC Load is not active
INFO:root:DC Load is active
INFO:root:Voltage: 0.003363
INFO:root:Current: 0.0
INFO:root:Power: 0.0
pytest Integration
Now that we have some classes ready to interact with our lab equipment, we can integrate them into the pytest framework. The pytest framework is much more than a simple test framework offering a few different assert variants for different data types or some nice looking test function entry points. Aside these rather basic features, pytest offers various entry points to hook into the execution flow of tests, a rich ecosystem of plugins, mocking (actually provided by the Python standard library), a modular fixture system (set-up/tear-down functionality) which we look into shortly, and much more.
Please note that this article is written for pytest version 7.x and up as some of the shown directives (e.g. the pythonpath directive) have been introduced with this version. Let’s start by understanding how the project is organized. The following listing shows the directory and files structure of the repository:
.
├── LICENSE
├── modules
│   ├── peaktech
│   │   └── dmm_2025.py
│   ├── riden
│   │   └── 60xx.py
│   └── rigol
│       └── dl3021.py
├── pyrightconfig.json
├── pytest.ini
└── tests
    ├── conftest.py
    └── test_dc_dc.py
Let’s go through relevant directories and files to understand their purposes:
modules: This directory contains subdirectories for different modules or instrument drivers used in the project. The classes of the first part of this article will be put here. Each subdirectory represents a specific instrument or device. In this example, there are three subdirectories: peaktech, riden, and rigol, each containing Python files that implement the functionalities of the respective instruments.pytest.ini: This file is the configuration file for pytest. It contains settings and options to customize the behavior of pytest during test collection/execution.tests: This directory contains the test cases for the project. Test cases are written using the pytest framework. In this example, there are two files in thetestsdirectory:conftest.py: This file contains configurations and fixtures that are shared among multiple test files. Fixtures are functions that provide test data or set up the test environment.test_dc_dc.py: This is a test file that contains test cases for testing the functionality of our DUT (a DC-DC converter). The filename usually starts withtest_to indicate that it contains test cases.
In order to get pytest to work with this structure, we have to enter the following contents into the pytest.ini file:
[pytest]
testpaths = tests
pythonpath = modules
log_cli = true
log_cli_level = INFO
This way, pytest searches for tests in the tests directory (testpaths directive) and for modules (the classes we created in the first part of this article) in the modules directory (pythonpath directive). In order to be able to write tests effectively, we have to complete two steps: first, we need to implement the glue code that makes our devices classes convenient to use in our test code. Second, we need to write the actual test functions. The remaining configuration directives set up Python’s logging functionality.
The glue code will be implemented as fixtures that we will put into the aforementioned conftest.py file. This is what we will do next.
Glue Code to Classes Representing Lab Equipment (Fixtures)
To instantiate and initialize the classes representing our lab equipment for any actual tests, we will use so-called test fixtures. The two authors, Steve Freeman and Nat Pryce, of “Growing Object-Oriented Software, Guided by Tests” (Addison-Wesley, 2010) define test fixtures as follows:
A test fixture is the fixed state that exists at the start of a test. A test fixture ensures that a test is repeatable — every time a test is run it starts in the same state so it should produce the same results. A fixture may be set up before the test runs and torn down after it has finished.
Using test fixtures in pytest, it is possible to share the same objects (keeping their state) across different tests. There is no point in initializing our DMM at the beginning of each test individually resulting in significantly slower test runs. Furthermore, having such initialization code in our tests would make the actual test code harder to read.
The recommended location for fixtures is either close to the tests (i.e. in files defining tests) or in local plugins defined in conftest.py files. As an initial example for a test fixture, I will show the DMM test fixture:
 1from typing import Iterator
 2import pytest
 3
 4from peaktech.dmm_2025 import DMM
 5
 6
 7@pytest.fixture(scope="session")
 8def peaktech_2025() -> Iterator[DMM]:
 9    try:
10        dmm = DMM()
11        measurement = dmm.read_measurement()
12        if measurement.unit != 'VDC':
13            pytest.fail(reason='DMM dial has not been set to VDC.')
14        yield dmm
15    except RuntimeError as exc:
16        pytest.fail(reason=f'Problem constructing DMM: {exc}')
The peaktech_2025 test fixture can be referenced by actual tests (see the next listing below) by specifying a parameter to the test function of the same name. By specifying the test fixture, the pytest framework executes the fixture’s function before the actual test and replaces the value of the test function parameter with the value given at the yield statement of the fixture’s function. This is the setup phase of the fixture. In this case, a DMM object is instantiated. In addition to that, a measurement is read from that instance before it is yielded by the function to make sure, the device is set up properly.
After executing the test, the pytest framework continues to execute the fixture function after the (first and here: only) yield statement. This is the tear-down phase of a fixture. We can use this to our advantage to clean up our test setup. Here we delete the instance explicitly to make sure that the serial port is closed so that new objects can be instantiated in other places.
Fixtures are a powerful tool that can be parameterized in many ways. Here, a scope of session is specified. This means that the fixture is instantiated and used for all tests executed in the same pytest call. It is also possible to, e.g. set the lifetime of fixtures to function which would initialize and tear-down given fixture for every test it is passed to as a parameter.
The next listing shows how we will use the peaktech_2025 fixture in an actual test:
 1from peaktech.dmm_2025 import DMM
 2
 3
 4def test_dc_dc_converter(peaktech_2025: DMM) -> None:
 5    measurement = peaktech_2025.read_measurement()
 6
 7    logging.info(measurement)
 8
 9    assert measurement.value > 0, "actual value must be greater than zero"
10    assert measurement.unit == "VDC", "only volts DC are supported by this test"
The fixture is passed as a parameter of the same name. We also added a typing hint so that our IDE’s language server supports us with helpful type information during writing the tests. The read_measurement() method returns a Measurement object which contains a value and a unit which are asserted after reading a measurement for their values.
Writing Actual Tests
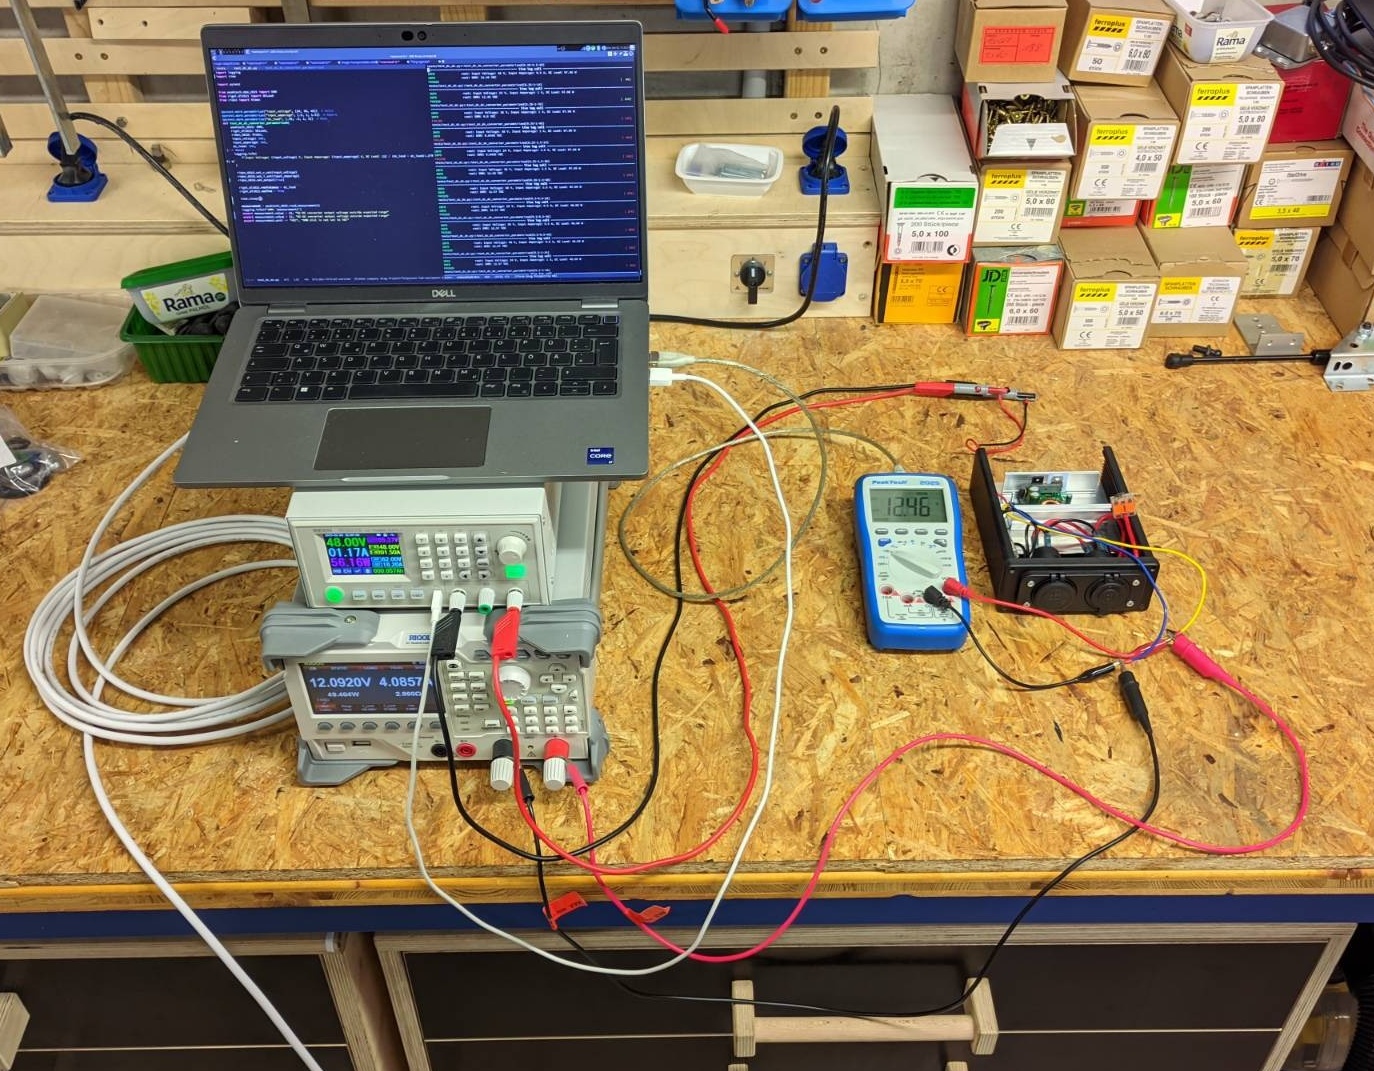
Before implementing and running actual tests, the DUT and required lab equipment are set up:
- Communication lines: the digital load is connected to my local network using a cable with RJ45 plugs. The digital multimeter and the lab power supply are connected to my notebook using USB cables.
- Power lines: I attached the inputs of the DC DC converter of my adapter to the lab power supply. The digital load in turn is connected to the DC DC convert’s outputs as are the inputs of the digital multimeter.
The measured voltage of the digital multimeter is what will be asserted in the tests. I want to make sure the output voltage of the DC-DC module does not drop depending on set values (supply voltage and amperage; DC load) in the operating range.
We will parameterize our tests so that we can easily test our system in many different situations without having to write a lot of code. Having aforementioned fixtures at hand, we can fully focus on the test logic. When accessing the fixtures in our tests, we can expect the objects representing our lab equipment to be properly initialized.
 1from typing import Iterator
 2from ipaddress import IPv4Address
 3import logging
 4import time
 5
 6import pytest
 7
 8from peaktech.dmm_2025 import DMM
 9from rigol.dl3021 import DCLoad
10from riden import Riden
11
12
13@pytest.fixture(scope='module')
14def rigol_dl3021(rigol_dl3021_factory) -> Iterator[DCLoad]:
15    """Concrete instance of our dc load shared across multiple tests."""
16    dl = rigol_dl3021_factory(IPv4Address('192.168.1.14'))
17    yield dl
18    dl.active = False
19
20
21@pytest.fixture(scope='module')
22def riden_6018(riden_6018_factory) -> Iterator[Riden]:
23    """Concrete instance of our lab power supply shared across multiple tests."""
24    r = riden_6018_factory('/dev/ttyUSB0')
25    yield r
26    r.set_output(False)
27
28
29@pytest.mark.parametrize("input_voltage", [24, 36, 48])  # Volts
30@pytest.mark.parametrize("input_amperage", [.5, 1.5, 3])  # Ampere
31@pytest.mark.parametrize("dc_load", [.35, .5, 1, 3])  # Ohms
32def test_dc_dc_converter_parametrized(
33    peaktech_2025: DMM,
34    rigol_dl3021: DCLoad,
35    riden_6018: Riden,
36    input_voltage: int,
37    input_amperage: int,
38    dc_load: int,
39) -> None:
40    dc_load_watts = 12 / (dc_load * dc_load)
41    logging.info(
42        f'Input Voltage: {input_voltage} V, Input Amperage: {input_amperage} A, DC Load: {dc_load_watts:.2f} W'
43    )
44
45    riden_6018.set_v_set(input_voltage)
46    riden_6018.set_i_set(input_amperage)
47    riden_6018.set_output(True)
48
49    rigol_dl3021.resistance = dc_load
50    rigol_dl3021.active = True
51
52    # wait until all components (e.g. capacitors) have adjusted to the current parameters
53    time.sleep(5)
54
55    measurement = peaktech_2025.read_measurement()
56    logging.info(f'DMM: {measurement}')
57    assert measurement.unit == "VDC", "DMM dial is not set to VDC"
58    assert measurement.value < 13, "DC-DC converter output voltage outside expected range"
59    if dc_load_watts <= input_voltage * input_amperage:
60        assert measurement.value > 11, "DC-DC converter output voltage outside expected range"
Using the @pytest.mark.parametrize decoration, pytest automatically executes the test_dc_dc_converter_parametrized test for the given parameters. As there are three parameters (input_voltage, input_amperage, and dc_load) with 3 or 4 values each, our test will be executed with 3 * 3 * 4 = 36 different combinations. The parametrize mark expects a name (the first argument) and an iterable (second argument). When specifying an argument to the test function of the same name (input_voltage in above example), the pytest framework replaces the value of this argument with the current value of the iterable. Parameterized tests are handled individually by pytest. It is also possible to execute a specific combination. This allows us to test our DC-DC converter with little code in many different scenarios.
In our final step, we will execute the test_dc_dc_converter_parametrized function with all combinations of input voltages and amperage as well as dc loads:
pytest -k test_dc_dc_converter_parametrized
================================================ test session starts ================================================
platform linux -- Python 3.11.3, pytest-7.4.0, pluggy-1.0.0
rootdir: /home/rpoisel/git/honeytreelabs/pytest-lab-equipment-example
configfile: pytest.ini
testpaths: tests
plugins: labgrid-23.0b2.dev303
collected 37 items / 1 deselected / 36 selected

tests/test_dc_dc.py::test_dc_dc_converter_parametrized[0.35-0.5-24]
-------------------------------------------------- live log setup ---------------------------------------------------
INFO               root: RIGOL TECHNOLOGIES,DL3021A,DL3A123456789,00.01.04.00.05

--------------------------------------------------- live log call ---------------------------------------------------
INFO               root: Input Voltage: 24 V, Input Amperage: 0.5 A, DC Load: 97.96 W
INFO               root: DMM: 0.0036000000000000003 VDC
PASSED                                                                                                        [  2%]
tests/test_dc_dc.py::test_dc_dc_converter_parametrized[0.35-0.5-36]
--------------------------------------------------- live log call ---------------------------------------------------
INFO               root: Input Voltage: 36 V, Input Amperage: 0.5 A, DC Load: 97.96 W
INFO               root: DMM: 0.0036000000000000003 VDC
PASSED                                                                                                        [  5%]
tests/test_dc_dc.py::test_dc_dc_converter_parametrized[0.35-0.5-48]
--------------------------------------------------- live log call ---------------------------------------------------
INFO               root: Input Voltage: 48 V, Input Amperage: 0.5 A, DC Load: 97.96 W
INFO               root: DMM: 0.0035 VDC
PASSED                                                                                                        [  8%]
tests/test_dc_dc.py::test_dc_dc_converter_parametrized[0.35-1.5-24]
--------------------------------------------------- live log call ---------------------------------------------------
INFO               root: Input Voltage: 24 V, Input Amperage: 1.5 A, DC Load: 97.96 W
INFO               root: DMM: 0.0035 VDC
PASSED                                                                                                        [ 11%]
...
============================= 36 passed, 1 deselected, 5 warnings in 194.58s (0:03:14) ==============================
Et voilà, thanks to our practical lab equipment classes and just a few lines of code, we can now effortlessly create highly expressive tests. In my perspective, the key here is clarity: with such high-level tests, it takes only moments to grasp the purpose of each test. We could have further made it even more obvious what’s going on in the tests using Gherkin language, but this is subject to another blog article in the testing domain. :-)
Discussion, Conclusion, and Outlook
Integrating new devices is some work, but as soon as one has prepared the classes and fixtures for a new device type, writing tests is a breeze. The biggest advantage is the good readability of the test code as well as the clear distribution of responsibilities of the code parts:
- Device classes describe the general interaction with devices: initialization, reading/setting values, shutdown.
- Fixtures define when to instantiate the device classes and how they should be re-used between the tests.
- The tests use fixtures in order to interact with the device classes.
As mentioned above, sample source code is available on GitHub. Future articles might deal with interacting with lab equipment in Gherkin language and writing unit-tests for lab equipment Python classes.
